Content Menu
● What Is Cuplock Type Scaffolding?
● Key Advantages of Cuplock Type Scaffolding
● Step-by-Step Guide to Assembling Cuplock Type Scaffolding
>> Step 1: Planning and Preparation
>> Step 2: Laying the Foundation
>> Step 3: Erecting the Standards (Verticals)
>> Step 4: Locking in the Ledgers (Horizontal Members)
>> Step 5: Installing Transoms and Additional Ledgers
>> Step 6: Adding Diagonal Braces
>> Step 7: Planking the Scaffold
>> Step 8: Installing Safety Components
>> Step 9: Final Inspection and Safety Checks
● Additional Tips for Efficient Cuplock Type Scaffolding Assembly
● Conclusion
● FAQ
>> 1. What makes cuplock type scaffolding easier to assemble than traditional scaffolding?
>> 2. Can cuplock type scaffolding be used for uneven ground?
>> 3. How often should cuplock scaffolding be inspected?
>> 4. Are special tools required for assembling cuplock scaffolding?
>> 5. What safety equipment is recommended during cuplock scaffolding assembly?
● Citations:
Cuplock type scaffolding is one of the most popular modular scaffolding systems used worldwide in construction and industrial projects. Its unique locking mechanism, robustness, and ease of assembly make it a preferred choice for scaffolding needs. This article provides a detailed, step-by-step guide on how to assemble cuplock type scaffolding, help you understand the process thoroughly. Whether you are a beginner or looking for a refresher, this comprehensive guide will ensure you assemble your cuplock scaffolding safely and efficiently.

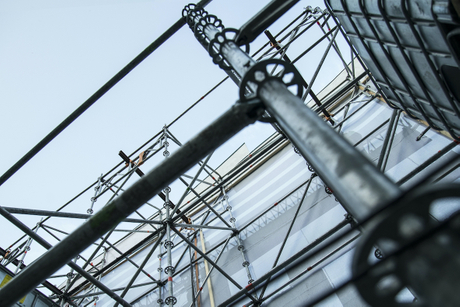
What Is Cuplock Type Scaffolding?
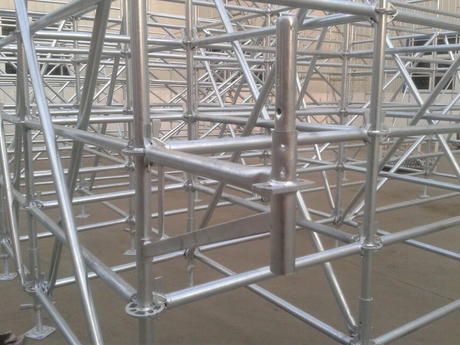
Cuplock type scaffolding is a modular system consisting of vertical standards with fixed lower cups welded at regular intervals (usually every 500mm) and movable upper cups that lock horizontal members such as ledgers and transoms. The system allows up to four horizontal components to be connected to a single vertical standard node, making assembly fast and secure without the need for nuts, bolts, or wedges.
Key Advantages of Cuplock Type Scaffolding
- Fast and Easy Assembly: The unique cup locking mechanism enables quick erection and dismantling.
- High Load Capacity: Made from high-grade steel, it supports heavy loads safely.
- Versatile: Suitable for facades, shoring, staircases, circular scaffolds, and mobile towers.
- Durable: Hot-dip galvanized finish protects against corrosion.
- Safe: Secure locking and comprehensive safety components ensure worker protection.
Step-by-Step Guide to Assembling Cuplock Type Scaffolding
Step 1: Planning and Preparation
Before starting assembly, thorough planning is essential. Determine the scaffold height, length, and configuration based on project requirements. Ensure the ground where the scaffold will be erected is stable, level, and free of debris.
- Personal Protective Equipment (PPE): Always wear hard hats, safety boots, gloves, and high-visibility clothing.
- Tools and Components: Gather all necessary components — standards, ledgers, transoms, braces, base jacks, scaffold boards, and accessories — along with tools like hammers and spirit levels.
Step 2: Laying the Foundation
Start by placing the base jacks or base plates on the ground. These provide a level and stable foundation for the scaffold.
- Adjust the base jacks to ensure the scaffold will be perfectly vertical.
- Use a spirit level to check the levelness of the base.

Step 3: Erecting the Standards (Verticals)
Standards are the vertical tubes with fixed lower cups welded at 500mm intervals.
- Insert the standards into the base jacks.
- Ensure they are plumb (vertically straight) using a spirit level.
- Connect standards vertically if the scaffold height requires multiple sections using standard splices.
Step 4: Locking in the Ledgers (Horizontal Members)
Ledgers are horizontal tubes that connect between the standards.
- Slot the ends of the ledgers into the fixed lower cups on the standards.
- Push the movable upper cup down over the ledger blade and rotate it to lock securely.
- The locking action produces a distinctive "click," confirming a secure connection.
Step 5: Installing Transoms and Additional Ledgers
Transoms provide additional support for scaffold boards and are installed perpendicular to ledgers.
- Insert transoms into the cups on the ledgers.
- Lock them using the same cup and blade locking mechanism.
- Add any additional ledgers as required to increase scaffold stability and support.
Step 6: Adding Diagonal Braces
Diagonal braces increase the scaffold's overall rigidity and prevent swaying or racking.
- Attach diagonal braces between standards at a 45-degree angle.
- Lock them into place using the cuplock mechanism or couplers as specified.
- Ensure braces are installed on all sides as per design requirements.
Step 7: Planking the Scaffold
Once the frame is secure, lay scaffold boards or planks across the transoms to create the working platform.
- Use high-quality scaffold boards that are free from defects.
- Secure boards to prevent movement or slipping.
- Ensure the platform is continuous and free from gaps.
Step 8: Installing Safety Components
Safety is critical in scaffolding work.
- Install guardrails and midrails on all open sides.
- Attach toe boards to prevent tools or materials from falling.
- Provide safe access via ladders or stair towers integrated into the scaffold.
Step 9: Final Inspection and Safety Checks
Before use, conduct a thorough inspection:
- Check all locking cups to ensure they are fully rotated and secured.
- Verify vertical and horizontal alignment.
- Confirm all braces and safety components are installed.
- Look for any damaged or missing parts and replace them immediately.
Additional Tips for Efficient Cuplock Type Scaffolding Assembly
- Always follow the manufacturer's cuplock type scaffolding technical manual.
- Train all personnel in safe assembly and dismantling procedures.
- Use mechanical aids for lifting heavy components when possible.
- Regularly inspect scaffolding during use, especially after adverse weather conditions.
Conclusion
Assembling cuplock type scaffolding is a straightforward process once you understand the unique cup and blade locking mechanism. By following the step-by-step guide outlined above, you can ensure a safe, stable, and efficient scaffold setup. Proper planning, adherence to safety protocols, and regular inspections are key to maximizing the benefits of this versatile scaffolding system. Whether for facade work, shoring, or complex scaffold structures, cuplock scaffolding offers speed, safety, and durability unmatched by traditional systems.

FAQ
1. What makes cuplock type scaffolding easier to assemble than traditional scaffolding?
Cuplock scaffolding uses a unique cup and blade locking system that allows up to four horizontal members to be locked onto a vertical standard with a simple rotation, eliminating the need for nuts, bolts, or wedges, which speeds up assembly.
2. Can cuplock type scaffolding be used for uneven ground?
Yes, cuplock scaffolding can be erected on uneven ground by using adjustable base jacks to level the scaffold before assembly, ensuring stability and safety.
3. How often should cuplock scaffolding be inspected?
Scaffolding should be inspected daily before use and after any event that could affect its stability, such as heavy winds or impact. Regular maintenance checks are essential to ensure safety.
4. Are special tools required for assembling cuplock scaffolding?
No special tools are required. Basic tools like a hammer for rotating the locking cups and spirit levels for alignment are sufficient.
5. What safety equipment is recommended during cuplock scaffolding assembly?
Workers should wear hard hats, safety boots, gloves, high-visibility clothing, and use fall protection equipment where necessary during assembly and use.
Citations:
[1] https://primesteeltech.co.in/how-do-you-install-cuplock-scaffolding.html
[2] https://www.youtube.com/watch?v=QSKy3RkmKs8
[3] https://www.huennebeck.com/uploads/files/cuplok_system_scaffold_user_guide_en_2015-05-29.pdf
[4] https://www.scafom-rux.com/en/scaffolding-blog/beginner-s-guide-to-scaffolding-types-the-cuplock-modular-scaffold
[5] https://www.hunanworld.com/news/how-to-install-cuplock-scaffolding
[6] https://www.youtube.com/watch?v=wBKilb9ALEY
[7] https://www.youtube.com/watch?v=fnJw0xLZE5s
[8] https://www.affixscaffolding.com/wp-content/uploads/2022/03/Affix-Cuplock-Manual.pdf
[9] https://www.youtube.com/watch?v=ojYR6MRAoEI