Content Menu
● Understanding the Tube Coupler Scaffolding System
● Planning and Preparation
● Step-by-Step Setup Guide
>> Step 1: Preparing the Base
>> Step 2: Erecting the First Level
>> Step 3: Plumb and Level
>> Step 4: Erecting Subsequent Levels
>> Step 5: Installing Platforms and Guardrails
>> Step 6: Tying into the Structure
>> Step 7: Final Inspection
● Safety Considerations
● Maintenance and Dismantling
● Regulatory Compliance
● The Importance of Qualified Scaffold Design
● Importance of Worker Training
● Conclusion
● FAQ
>> 1. What are the advantages of using a tube coupler scaffolding system?
>> 2. What types of couplers are used in a tube coupler scaffolding system?
>> 3. How often should a tube coupler scaffolding system be inspected?
>> 4. What is the maximum height for a tube coupler scaffold?
>> 5. What are the key safety considerations when working with a tube coupler scaffolding system?
● Citations:
The tube coupler scaffolding system is a versatile and robust scaffolding solution used extensively in construction. Unlike pre-fabricated systems, tube and coupler scaffolding allows for greater flexibility in design and can be adapted to complex structures and unique building geometries[7]. However, this adaptability comes with a responsibility to ensure safe and proper setup. This article provides a detailed guide on the best practices for setting up a tube coupler scaffolding system, emphasizing safety, stability, and regulatory compliance.

Understanding the Tube Coupler Scaffolding System
Before delving into the setup process, it's essential to understand the components of a tube coupler scaffolding system:
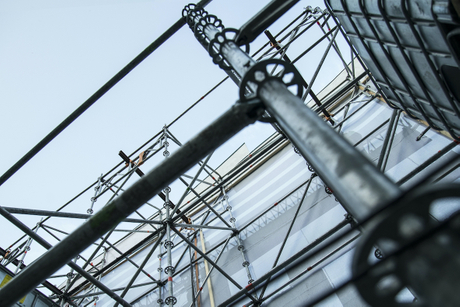
- Tubes: These are the main structural elements, typically made of steel, that form the vertical and horizontal members of the scaffold[7].
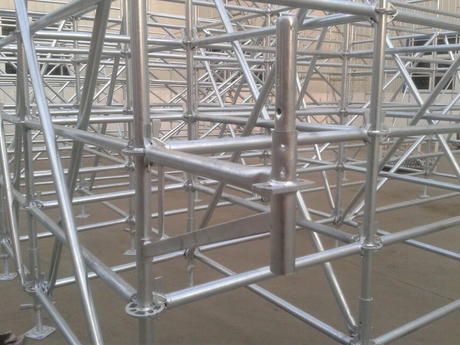
- Couplers: These are the fittings that connect the tubes together. There are various types of couplers, each serving a specific purpose[7].
- Base Plates: These provide a stable foundation for the scaffold, distributing the load evenly[9].
- Adjustable Base Jacks: These allow for height adjustments and ensure the scaffold is level, even on uneven ground[9].
- Guardrails: These provide fall protection and are a critical safety component[4].
- Toeboards: These prevent tools and materials from falling off the platform[4].
- Braces: Diagonal and horizontal braces provide stability and prevent the scaffold from swaying or collapsing[1].
- Planks or Platforms: These create the working surface for the scaffold[5].
Planning and Preparation
Proper planning is crucial for a safe and efficient setup:
- Site Assessment: Conduct a thorough site assessment to identify potential hazards, such as uneven ground, overhead power lines, or underground utilities[7].
- Scaffold Design: Develop a detailed scaffold design that considers the load requirements, height, and specific geometry of the structure. For scaffolds exceeding 125 feet in height, the design must be prepared by a qualified engineer[2][4].
- Material Inspection: Inspect all scaffolding components for damage or defects before use. Couplers should be checked to ensure they are secure and functioning properly[3]. Do not use any components that are bent, rusted, or otherwise compromised[3]. Gray cast iron should not be used[8].
- Personnel Training: Ensure that all workers involved in the setup have received proper training on the safe erection and use of tube coupler scaffolding systems.
Step-by-Step Setup Guide
Step 1: Preparing the Base
- Leveling the Ground: The foundation should be flattened and compacted during the scaffolding erection[9]. Level the ground where the scaffold will be erected. Use shims or base plates to compensate for any unevenness[3][9]. Reliable drainage measures must be taken to prevent the foundation from water soaking[9].
- Installing Base Plates: Place base plates on the leveled ground. These plates distribute the load and prevent the scaffold from sinking into the ground[9].
- Positioning Adjustable Base Jacks: Put and fix jack base onto the base plates[9]. Sleeve the base collar into the jack base[9]. Put the adjustable jack bases to the designed position and fix them onto the base plate[9]. Sleeve the lower part of the base collar into the jack base completely[9]. Adjust the height of the jack base[9].
Step 2: Erecting the First Level
- Installing Vertical Tubes (Standards): Insert the standard into the base collar[9]. Insert the standard into the base collar and fix it with a spigot pin[9]. Make sure the standard end with a fixed drop forged joint pin upward[9].
- Connecting Horizontal Tubes (Ledgers): Connect two adjacent base collars with a ledger[9]. Wedge the ledger head into the ring plate[9]. Make sure the hole on the wedge head is aligned with the mounting hole on the ring plate[9]. Fix the ledger head and the base collar with a wedge pin through the mounting hole[9].
- Using Couplers: Use right-angle couplers to connect the ledgers to the standards. Ensure the couplers are securely tightened[7]. Only structural type couplers should be used[8].
- Installing Diagonal Braces: Connect the horizontal diagonal brace[9]. Connect two base collar ring plates in a horizontal diagonal line with a horizontal diagonal brace[9].
Step 3: Plumb and Level
- Checking Verticality: Use a spirit level to ensure that the standards are perfectly vertical[7].
- Checking Level: Ensure the ledgers are level. Adjust the base jacks as needed to achieve a level platform[7].
- Temporary Bracing: Install temporary bracing to hold the first level in place while you continue erecting the scaffold.
Step 4: Erecting Subsequent Levels
- Repeating the Process: Repeat steps 2 and 3 to erect subsequent levels. Connect the second layer ledgers to the ring plate on the upper part of the standard as described in step 4[9].
- Vertical Bracing: Connect the vertical diagonal brace[9]. Connect two adjacent standards at different horizontal lines with a vertical diagonal brace via diagonal brace head at both ends, thereby forming a triangle with the standard and the ledger and providing a more stable ringlock scaffolding system based on the theory of triangular stability[9].
- Spigot Pins: Insert the second layer standards to the upper part of the first layer standards then fix the standards with a spigot pin via the hole on the fixed drop forged joint pin[9].
Step 5: Installing Platforms and Guardrails
- Installing Planks: Hook the steel plank onto the second layer ledgers[9]. Hook the steel plank onto the second layer ledgers and make sure steel planks are closely arranged and firmly fixed on ledgers[9]. Regulations require that all scaffold platforms must be at least 460 mm (18 in) wide and all platforms above 2.4 m (8 ft) must be fully decked[5].
- Guardrail Posts: Install guardrail posts at regular intervals along the perimeter of the platform.
- Guardrails and Midrails: Attach guardrails and midrails to the posts. Guardrails must be able to withstand a specified force[4].
- Toeboards: Install toeboards along the edges of the platform to prevent tools and materials from falling[4].
Step 6: Tying into the Structure
- Tie-Ins: For scaffolds exceeding a certain height, tie the scaffold to the building or structure at regular intervals[7]. This provides additional stability and prevents the scaffold from swaying.
Step 7: Final Inspection
- Thorough Inspection: Conduct a final inspection of the entire scaffold to ensure that all components are properly installed and that the scaffold is safe for use[3]. Check all couplers, braces, guardrails, and toeboards[3].
- Tagging: If the scaffold passes inspection, tag it as safe for use[3].

Safety Considerations
- Load Capacity: Be aware of the scaffold's load capacity and avoid overloading it[4]. Heavy-duty scaffolding can endure 75 lbs. per square foot[4]. Light-duty Scaffolding, Medium-duty Scaffolding, and Heavy-duty Scaffolding should be used for appropriate loads[4].
- Fall Protection: Always use proper fall protection measures, such as safety harnesses and lanyards[4]. Active Fall Protection measures include the use of Personal Fall Arrest Systems that catch workers in the event of a fall[4].
- Weather Conditions: Avoid working on scaffolds in high winds or other adverse weather conditions[4].
- Electrical Hazards: Be aware of overhead power lines and maintain a safe distance[7].
- Housekeeping: Keep the scaffold platform clean and free of debris to prevent tripping hazards[6].
Maintenance and Dismantling
- Regular Inspections: Conduct regular inspections of the scaffold to identify any damage or defects[3].
- Prompt Repairs: Repair or replace any damaged components immediately[3].
- Proper Dismantling: Dismantle the scaffold in a systematic manner, following the reverse order of the erection process.
Regulatory Compliance
- OSHA Standards: Ensure that the tube coupler scaffolding system complies with all applicable OSHA standards[7].
- Local Regulations: Be aware of and comply with all local and regional regulations pertaining to scaffolding safety[7].
The Importance of Qualified Scaffold Design
A Qualified Scaffold Design is pivotal for constructing safe scaffolding structures, particularly those that rise over 125 feet[4]. Such designs must be conceptualized by certified professionals to ensure that all safety standards are met[4]. This involves calculating load capacities and ensuring the scaffold can bear at least four times the maximum intended load without faltering[4].
Importance of Worker Training
Providing comprehensive training to workers on the safe use and assembly of the scaffolding is vital to prevent accidents and ensure proper handling[4]. Proper training of scaffolders is very important[6].
Conclusion
Setting up a tube coupler scaffolding system requires careful planning, attention to detail, and a commitment to safety. By following the steps outlined in this guide and adhering to all applicable regulations, construction companies can ensure a safe and productive working environment for their employees. The versatility and strength of tube coupler scaffolding systems make them an excellent choice for a wide range of construction projects, but only when properly erected and maintained.

FAQ
1. What are the advantages of using a tube coupler scaffolding system?
Tube coupler scaffolding systems offer several advantages, including flexibility in design, adaptability to complex structures, high load-bearing capacity, and ease of assembly and disassembly.
2. What types of couplers are used in a tube coupler scaffolding system?
Various types of couplers are used, including right-angle couplers, swivel couplers, sleeve couplers, and base couplers. Each type serves a specific purpose in connecting the tubes and providing stability to the structure.
3. How often should a tube coupler scaffolding system be inspected?
A tube coupler scaffolding system should be inspected before each use and regularly throughout the project, especially after any incidents that could have affected the scaffold's integrity.
4. What is the maximum height for a tube coupler scaffold?
For scaffolds exceeding 125 feet in height, the design must be prepared by a qualified engineer[2][4].
5. What are the key safety considerations when working with a tube coupler scaffolding system?
Key safety considerations include proper erection, load capacity, fall protection, weather conditions, electrical hazards, and housekeeping.
Citations:
[1] https://www.youtube.com/watch?v=ZM6Tlh_NAnQ
[2] http://www.osha.gov/etools/scaffolding/supported/tube-coupler
[3] https://safetyeducations.com/tube-and-coupler-scaffolds/
[4] https://scaffoldtype.com/tube-and-coupler-scaffolding/
[5] https://www.ihsa.ca/rtf/health_safety_manual/pdfs/equipment/Scaffolds.pdf
[6] https://aaitscaffold.com/scaffolding-hazards/what-are-scaffolding-hazards-at-construction-sites-and-how-can-those-be-prevented/
[7] https://www.osha.gov/sites/default/files/publications/OSHA_FS-3759.pdf
[8] https://cdn.dal.ca/content/dam/dalhousie/pdf/dept/facilities/FM%20Safety/fallprotection/Safe%20Job%20Procedure%20for%20Erecting%20Tube%20and%20Clamp%20and%20All%20Around%20Scaffolding%20June%202014.pdf
[9] https://www.defenal.com/service/installation-maintenance.html